When I started art journalling and collage, I was at a loss as to how I could create pages with lovely images. I had not picked up a pencil to draw anything in years and I was hesitant to "mar" the pristine pages of my chosen art journal with them. I didn't want to use mostly magazine cut-outs (though there is nothing wrong with using these -- I just prefer to use them less) and neither did I want to go through the trouble of scanning actual photos. Digital art? Hah -- my 3 year old niece knows more than I do about that.
There were also some images that didn't look good just cut up and glued to a page. I wanted images with attitude. LOL.
And then I learned that there was such a thing as "transfers".
I first came across the term while surreptitiously browsing a book on collage. Intrigued, I sought out tutorials and information on how to do image transfers. Here are some of the transfer techniques that I use the most:
Gesso Transfer
Yup, you guessed it. Gesso, that white substance you use to prime your substrate, is a great transfer agent. Just slap the gesso on the image, put the image face down on your page and rub over it with a bone folder. Or, if you are like me and you like to find substitutes for tools, in place of a bone folder, you can use the back of a spoon, your fingernail or an old credit card or ATM card. Gesso transfers, done properly, can give you a pretty crisp image. Here's one I did using an image of a young mestiza. The image was printed out on matte photo paper on a colored printer and transferred to a page of an old book I had converted to an art journal.
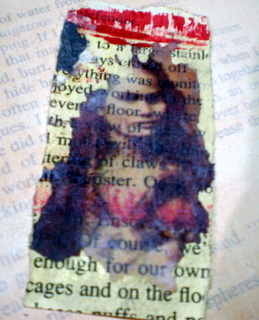
As you can see, the image did not transfer fully but such is the nature of gesso transfers -- there are good ones and then there are the not-so-good ones. It all depends on the look you're aiming for really. This particular transfer I categorize under the good ones because I was really aiming for the worn out, distressed look. There was a bit of red paint smudged on the page but I like it - I think it gave the image more "attitude".
Tape Transfers
If you want a more complete transfer you can try the tape method. A roll of clear packing tape (yes - packing tape) about 2 inches wide is all you need for this. Cut a piece of tape large enough to cover the image you want to transfer and lay this over it. Here's a couple of images already covered with my trusty clear packing tape.
Make sure you rub that tape onto the image well with a bone folder, the back of a spoon or in the case of these two above -- the rounded end of the pair of scissors I had on hand (yeah, yeah -- too lazy to get up and get my bone folder).
Again, there will be peeling and rubbing involved -- not THAT kind so please wipe that dirty smirk off your face. Wet the back of the paper the image is on and rub the excess paper off gently with your finger. I say gently because rubbing too firmly will most likely lift the entire image off leaving you with a blank piece of soggy tape.
 |
| That's my trusty roll of 2-inch clear packing tape at the back |
Again, there will be peeling and rubbing involved -- not THAT kind so please wipe that dirty smirk off your face. Wet the back of the paper the image is on and rub the excess paper off gently with your finger. I say gently because rubbing too firmly will most likely lift the entire image off leaving you with a blank piece of soggy tape.
 |
| Starting to peel. (Please excuse my self-healing cutting mat - it is well-loved and used much lol) |
A tape transfer will give you an almost sheer image and these are great if you want to layer images. You can just cut off the excess tape (I usually cut around the image loosely), apply watered down glue to it and put it down on the page.
Here are the two finished transfers.
 |
| I put this over a page with colored images so you can see how transparent the image of the girl is. |
 |
| See how the print on the page is coming through the image? |
Acrylic Gel Medium Transfers
This was the very first method I tried and I happened to learn it by accident.
I got some acrylic gel medium on one of my images by accident and as clumsy as I am, I also got it stuck to a piece of cardstock. Realizing my mistake, I pulled the paper off the cardstock and noticed that parts of the image had been transferred to the blank card stock. You can bet I never looked at my jar of acrylic medium in the same way after that.
Simply apply some of the medium onto your image (I sometimes apply some of the medium onto my substrate as well) and slap the image face down on the page. As with the gesso transfer, use a bone folder or an old credit card to rub the image firmly onto the paper. Lift one side of the paper and peel the excess off leaving the image on your transfer surface. To get more of the excess paper off, dampen the back of the image with water and rub gently with your finger.
This image was transferred onto a page I tore out of one of my altered book journals

You can also coat your image with the acrylic gel medium. Just slap on at least 4 layers of the medium (make sure each layer is completely dry before you add another on top), turn the image over and gently peel the paper at the back of the image after getting it wet with water. This results in what I call a "skin" -- an almost transparent image on a very, very thin sheet of medium. It is quite fragile so I keep these sandwiched in between pages of an old book to keep them from tearing.
This is what it looks like while the acrylic medium is drying ( if you are not the most patient person in the world, a hair dryer set to the lowest setting can speed things up)

Here's the little girl on the image -- she's starting to show through!

And here is the finished "skin"


So now you're probably asking yourself -- what am I going to do with these? I'll give you a few suggestions in the next post. And I promise it won't be months from now. :-)
No comments:
Post a Comment
Talk to me