Monday, October 22, 2012

Homecoming


I took another break – if you can call a few months a short break.  But I had to go on a long walk on unfamiliar roads even if it meant ignoring that gentle yet probing voice in my head that whispered now and then:  Where are you? 

After months of lying idle, after a few weeks of dabbling here and there, my hands have again picked up needle and thread, paintbrush and paint. 


I guess it’s true that no matter how far you wander, you will always, always, always come home.  


Tuesday, April 24, 2012

Round Two at 10A Alabama

The sun was already halfway up the sky when  I left home with my usual art fair stuff all packed helter-skelter the night before.  Of course I crammed and on the way to 10A Alabama I kept running a mental list in my head of what I was sure I forgot to bring. I didn't forget anything. :-)

This would be my second time to join the 10A Alabama Art Fair.  I had promised myself that, with time being a commodity I am short with, I will limit my art fair escapades this year to this venue for several reasons, the first one being that the vibe of this place is unbelievably chill.  I love how other sellers chat with each other and swap  stories and tips, how the items on display and on sale are lovingly made by hand from some of the most unusual materials.  The organizers are some of the coolest people around and they do make an effort to make sure that everyone is happy.  Regular sellers greet each other like old friends and warmly welcome new ones to the fold. This is my happy place as far as art fairs are concerned.

The thing I like about my pieces is that they are small and easy to set up.  I had brought several pieces of my soutache jewelry, introducing the line for the first time, and I was instantly rewarded with two purchases from a young lady who seemed fascinated with the handwork that went into making a piece.


Finished with setting up and getting several sales within an hour of doing so, I thought I'd reward myself by taking a look around.  This is what I found:

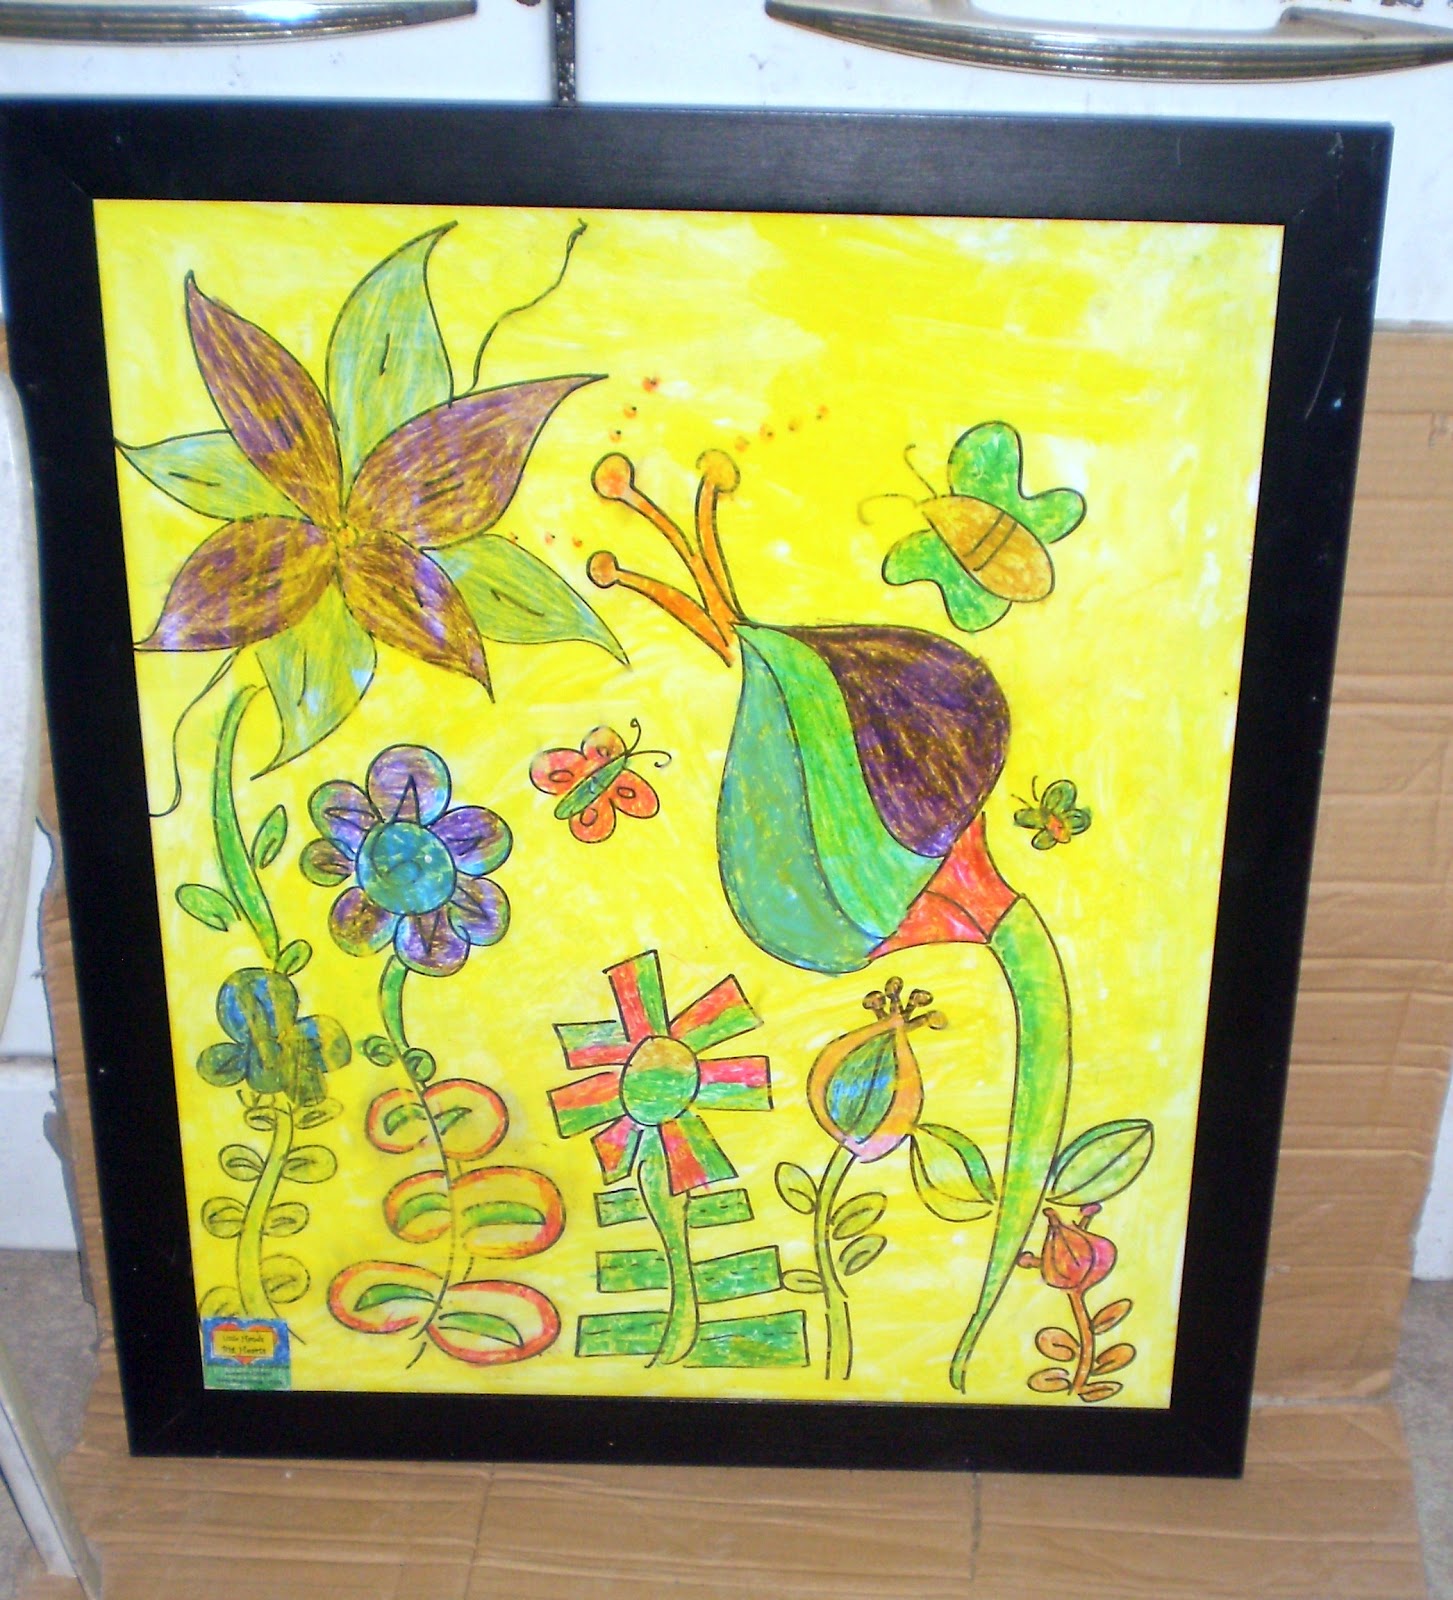
Paintings by the young wards of Cribs Foundation -


The happy colors in these works of art immediately brought a smile to my face and the little girls who painted them were so much fun to talk to!

A little further in I spotted what looked like a huge, lighted pineapple


Upon closer inspection, I realized that I wasn't seeing things - it WAS a huge, lighted pineapple. And there were more lovely lamps set up near it in a shock of bold, bright colors -


These lamps are by Light 'Em Up and are made of flexible, durable, lightweight and washable polycarbonate material.  The lamps' design and color can be customized to your preference (that big pineapple was a custom order) and would make a colorful yet functional addition to any space. 

My attention was also caught by these "solar jars" they had for sale - these are powered by a tiny solar cell which, when fully charged,  provides enough power in the light bulb inside the jar to run for about 8 hours.  This is a great and eco-friendly alternative to a plugged in night light.   


Of course, being a jewelry maker, I am always drawn to the bling and Junkshop Abubot was one of my favorite stops of the day. 


I think Ros Rotugal Flores, the sweet lady behind these hand beaded creations, outdid herself this time by creating these luscious bangles.  I mean, look at that beadwork! She also had on display some really pretty decoupage and beaded button rings like these -


And who can resist the tiny, tiny handbound books turned into pendants by Alunsina Handbound Books


I drooled over their new line of journals (yes, I am a sucker for the blank page) covered in fabric or decoupaged maps. Nadja and Enan, the couple behind Alunsina, never fail to amaze me with the craftsmanship in their work.  I am eagerly awaiting the launch of their bag line :-).


New kid at the art fair, Nunanuna, sold shopping bags made out of  upcycled coffee bags


And they also had several hand sewn clutches -- I happily went home with this one pictured below :-)


Of course, there was Betsy and her ladies - this darling trio of ladies painted on empty wine bottles looked like they were having a good time


Betsy's cute origami earrings were a hit.  Here she is showing off her butandings - 


Betsy uses recycled materials for her little earrings - candy wrappers, little receipts and I think I even saw a bus ticket or two that were turned into tiny cranes.  

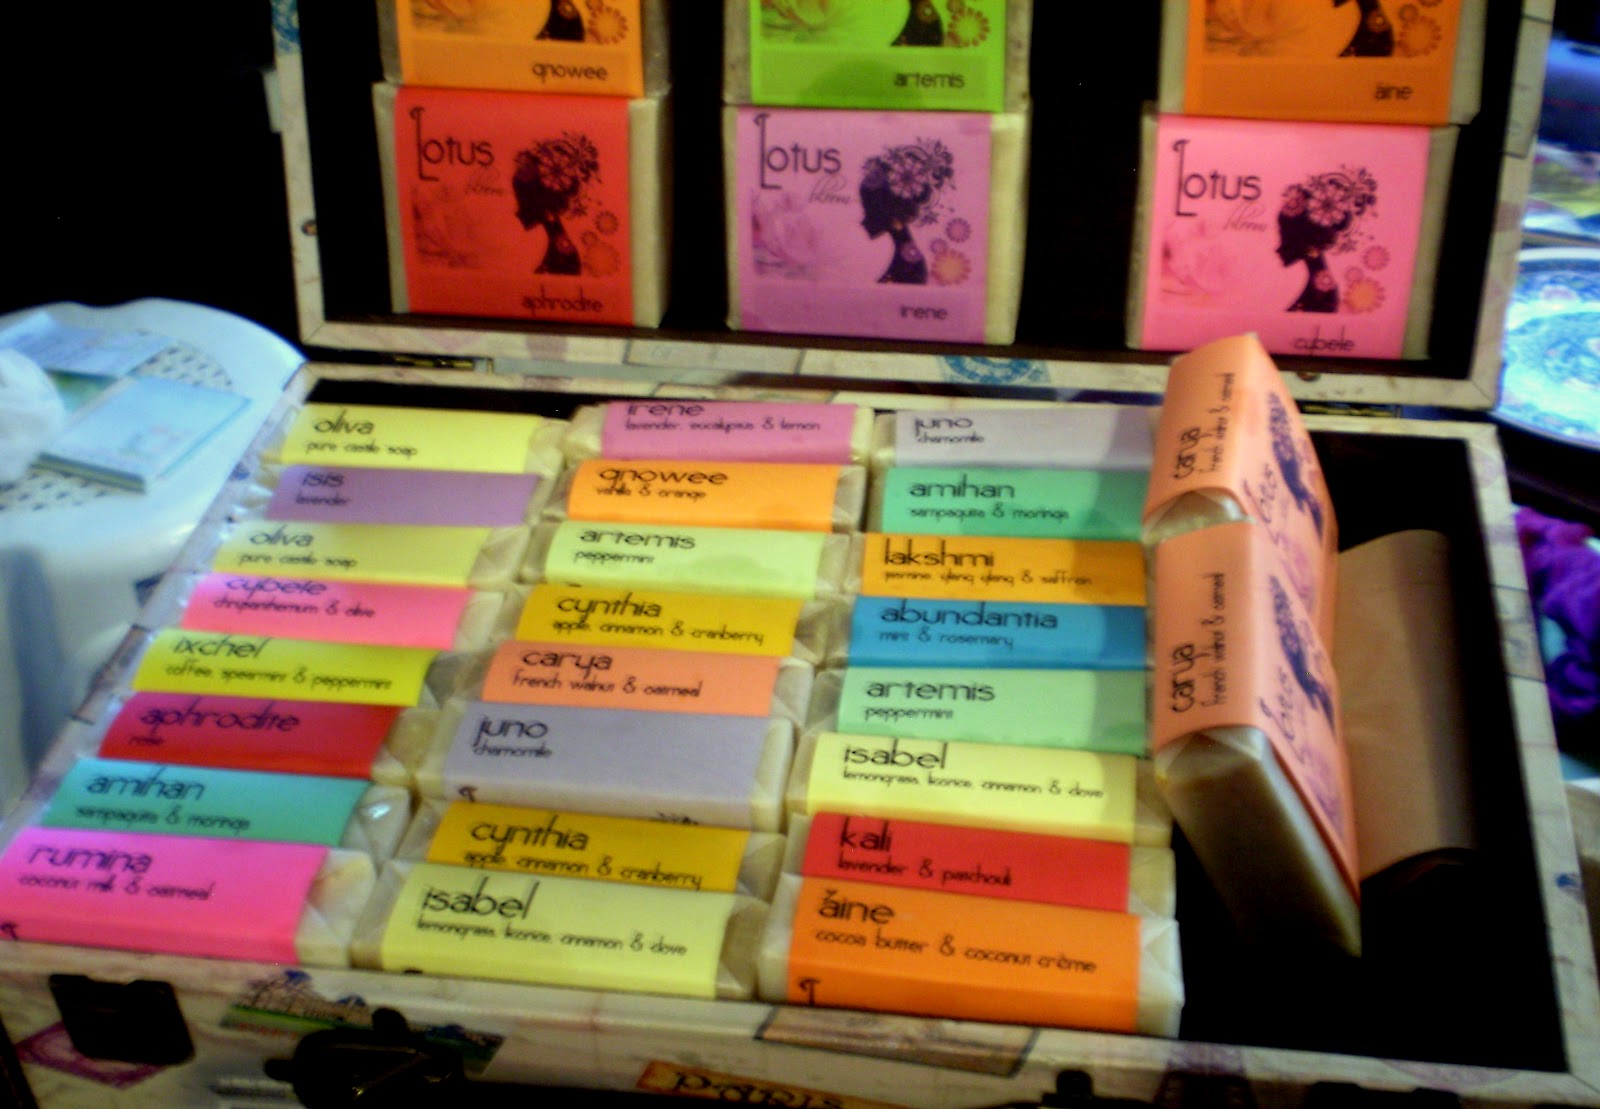
Inside, I stopped by Lotus Bloom Handcrafted Soaps table and was instantly smitten.  Loved the way that she named her soaps -- and I loved the fact that the ingredients she uses in them are all natural


The heat was stressing me out a bit and Joanne Quintana, the lady who makes all these soaps by hand, urged me to try her one of her relaxing balms.  Just a tiny bit of the magick balm applied to the temples made me feel so calm and relaxed. 


Feeling much better, I wandered out into the garden to find a little table decked out with rubber stamps, paint, and all kinds of crafty materials.  Blank fabric penants were also provided so that anyone who was in the mood to create something could do so -- and hang it up in the garden for all to see.  Another thing I love about 10A Alabama -- creativity is nurtured at every turn. 


I returned to my booth to find that I had a mannequin from which to display my necklaces.  Thank you  Mr. B, for trying to model these but I think next time I'll go with the neck forms lol. 


Having gotten tired of playing mannequin, Mr. B wandered off to the next booth that sold some unique handmade necklaces, leather wallets and small leather pouches. He came away with a really unique looking pendant. 


As the sun dipped low in the sky, we were treated to the music of The Slinks who did a mini-concert right there in the garden. It was lovely to sit in the balmy afternoon, wind cooling brows that were earlier on beaded with the light sheen of sweat, listening to songs like Summertime performed by this cute couple. 


Can't wait for round three. It would be nice to see you there :-)

Wednesday, April 18, 2012

Wishcasting Wednesday: Where Do You Wish to Go?

I want to walk along that road lined with monsters on each side
To go within the darkest place of me.
I want to see what lies there - and maybe see if something lives still
I want to run and cut my feet on sharp glass
And watch myself bleed
Bleed out the tears that refuse to fall
Bleed out the cry that has no sound
Bleed out the flesh that hangs on bone
Bleed out the dead, those gone

I want to fly against dark thunderclouds
Lightning shooting from around
I want to breathe in the acid rain
That burns a fiery path in my throat
Burn out the dream that was never born
Burn out the story that was never told
Burn out the image that was never whole

And when I return, bleeding and burnt
I wish to fall into arms that will
Catch the cleansing tears that fall
Listen to the story I will finally tell
Complete the image and make me whole
Feed the flesh, and strengthen the bone
Turn the cry into a song

Friday, April 6, 2012

I Like 'Em Quirky

Blame the yarn pom-pom puppets in 2nd grade. They started it all - started her on this non-stop, ever evolving journey of crafting that show no signs of slowing down.  I always thought yarn was never good for anything else except to initiate the innocent into the crazy world of crafting.  This proves it. 

I mean, aren't these decidedly crazy-quirky?


From old throw-away, almost dead materials, Nikki of Junk Studio creates some amazing pieces of wearable art.  She has been selling her creations since her junior year in college, starting with decoupaged and hand-painted bangles and bottle cap rings, gradually moving on to some really fun stuff like these vinyl record book-ends

A staunch supporter of all things handmade, Nikki is part of the growing community of crafters and artisans who showcase their pieces at the Alabama Art Fair.  Her love for crafting has given her the push to go at it full time -- eventually quitting the day job and devoting herself to making these funky pieces.

One of her bottle cap rings -- I like this!
I don't know but I find this one quite adorable :-)
Since starting Junk Studio, Nikki says she's found herself to be more conscious of what she buys and prefers to purchase, wear and use products that are eco-friendly and to the extent possible, handmade.  Being a crafter herself, she appreciates the work that handmade artisans put into producing a piece and is  happy to be able to put in her own effort at reducing the waste that threatens to take over our world  by turning them into beautiful, functional pieces.  She also believes that the best way to promote handmade is to support local handmade artisans in any way you can and I totally agree - I mean, wearing this necklace below is definitely a chic way of doing it and it won't even break the bank!


Nikki uses a variety of materials in her craft -- pages from old magazines, postcards, junk mail, beads and even hardware store finds.  I mean, who knew those little nuts and bolts could be turned into a funky piece of jewelry like the pendant below


Or that little strips of discarded fabric could eventually emerge as one fierce statement necklace -  


She derives inspiration for design from just about anything -- and the urge to create a new piece can hit her at the oddest moments.  An idea for a piece of jewelry can creep up unexpectedly when she's out getting food, or spotting an item that has seen better days but still has some kick to it can get her brain churning and before you know it, a new quirky, funky wearable art piece is born.  But when her muse takes an unannounced vacation, Nikki turns to reading craft magazines and listening to music to coax it back - and before long she's at her work table producing more of these beauties -

Some may find this a little dark -- I find it rather  romantic actually 
She considers Gustav Klimt, Salvador Dali and Frida Kahlo as her art heroes so a pendant decoupaged with the piercing countenance of the wonderful Ms. Kahlo is definitely on the list


Nikki takes great care in making her pieces, making sure that each decoupaged piece is thoroughly sealed to protect it from moisture or our intense Manila heat.  I appreciate that because it tells me that she cares for her customer and makes sure that they get not only a little bauble they can wear a few times but maybe a piece that can be passed on by a quirky, spunky grandma to an equally quirky, spunky grandchild.

Where's Nikki?  She's everywhere! Of course you can find her on April 14 and 15 at the Alabama Art Fair.  Can't go? She's online -- Junk Studio has an Etsy shop and you can also get the latest updates on what she's up to on Tumblr.  If that isn't enough, you can visit Junk Studio's Facebook page.  And if it's first dibs you want on whatever new piece she just made, follow her on Twitter.com/junkstudio

All images courtesy of Junk Studio

Sunday, April 1, 2012

What a Doll!

I can’t sew. Oh, I can do a mean running stitch but that’s about it.  Good thing that’s the only stitch that my soutache jewelry asks of me most of the time.

Trying to sew using a sewing machine is, for me,  like solving a difficult algebraic problem.  I can’t sew. There, I said it again. And forget quilting  - is IS rocket science to me.  So when I meet someone who can sew and quilt, my internal dialogue goes something like this: “OMG, she can sew. I wish I could sew. I could try. Or not. I can’t sew. OMG she can sew.”

That’s exactly what went through my head when I saw these adorable dolls that Jacklyn Colmenares-Zapatos makes.  Jacklyn loves to quilt and she used to make them to give away to friends before her son was born.  After having her son, she made more quilts for him and a niece and, as any crafter will tell you, those bits of unused fabric and quilt squares you just cannot bear to throw away WILL pile up. Which is exactly what Jacklyn discovered.

What to do, she must have asked herself.  Since you can't keep a creative person from coming up with a creative solution, I.am.handmade was born.

Jacklyn turns her excess fabric from quilts and other sewing projects into these one-of-a-kind cloth dolls that I personally think are better looking than all those dolls you can get at the stores (yeah - the kind that look like they had a ton of make up slathered on them).  They're decidedly whimsical, a throw-back to the days when everything was simple and when a doll was a little girl's very first BFF and not a mini-mannequin to dress up in the latest fashion. The fact that they are made out of rescued and recycled material makes them all the more appealing -- I keep thinking that each one of these little babies has a story to tell about how they were put together if only I can be quiet for a while and listen really close. 


A working mom, Jacklyn juggles her time between caring for her family, her job and creating these little beauties.  She usually doesn't sketch out her designs and instead prefers to let the materials "talk" to her and tell her how they want to look like when done.  That way, Jacklyn says, she has the freedom to change things up and make something totally different when the mood hits her - which means that you can expect her to come up with some quirky yet adorable stuff like these -


Or fun little critters like these -


She also makes dolls with hand-painted faces like this little lady over here -


And of course, there's always, ALWAYS a diva in the pack.  She's my favorite (why do I tend to gravitate to the divas? lol) Here she is - decked out in all her finery -


So between a waxen-faced, stiff-limbed mass manufactured doll, I'd really rather have these to give to my nieces.  I might even keep one for myself.  So I'm going to head over pronto to I.am.handmade's Facebook page and visit her newly opened shop on Etsy too.  Or maybe I'll go visit her booth at the Alabama Art Fair on April 14 and 15 and "visit" with these little girls for a while, listen to their stories about how they were put together, and pick the one with the mostest in diva attitude. I suggest you do the same. :-) 

Monday, March 26, 2012

Technique: Image Transfers

When I started art journalling and collage, I was at a loss as to how I could create pages with lovely images.  I had not picked up a pencil to draw anything in years and I was hesitant to "mar" the pristine pages of my chosen art journal with them.  I didn't want to use mostly magazine cut-outs (though there is nothing wrong with using these -- I just prefer to use them less) and neither did I want to go through the trouble of scanning actual photos. Digital art? Hah --  my 3 year old niece knows more than I do about that. 

There were also some images that didn't look good just cut up and glued to a page.  I wanted images with attitude. LOL.

And then I learned that there was such a thing as "transfers".  

I first came across the term while surreptitiously browsing a book on collage.  Intrigued, I sought out tutorials and information on how to do image transfers.  Here are some of the transfer techniques I use often.

Gesso Transfer

Yup, you guessed it. Gesso, that white substance you use to prime your substrate, is a great transfer agent.  Just slap the gesso on the image, put the image face down on your page and rub over it with a bone folder. Or, if you are like me and you like to find substitutes for tools, in place of a bone folder, you can use the back of a spoon, your fingernail or an old credit card or ATM card.  Gesso transfers, done properly, can give you a pretty crisp image.  Here's one I did using an image of a young mestiza.  The image was printed out on matte photo paper on a colored printer and transferred to a page of an old book I had converted to an art journal.


As you can see, the image did not transfer fully but such is the nature of gesso transfers -- there are good ones and then there are the not-so-good ones.  It all depends on the look you're aiming for really.  This particular transfer I categorize under the good ones because I was really aiming for the worn out, distressed look.  There was a bit of red paint smudged on the page but I like it - I think it gave the image more "attitude".  

Tape Transfers

If you want a more complete transfer you can try the tape method.  A roll of clear packing tape (yes - packing tape) about 2 inches wide is all you need for this.  Cut a piece of tape large enough to cover the image you want to transfer and lay this over it. Here's a couple of images already covered with my trusty clear packing tape.

That's my trusty roll of 2-inch clear packing tape at the back
Make sure you rub that tape onto the image well with a bone folder, the back of a spoon or in the case of these two above -- the rounded end of the pair of scissors I had on hand (yeah, yeah -- too lazy to get up and get my bone folder).

Again, there will be peeling and rubbing involved -- not THAT kind so please wipe that dirty smirk off your face.  Wet the back of the paper the image is on and rub the excess paper off gently with your finger.  I say gently because rubbing too firmly will most likely lift the entire image off leaving you with a blank piece of soggy tape.

Starting to peel.  (Please excuse my self-healing  cutting mat  - it is well-loved and used much lol)
A tape transfer will give you an almost sheer image and these are great if you want to layer images.  You can just cut off the excess tape (I usually cut around the image loosely), apply watered down glue to it and put it down on the page.  

Here are the two finished transfers.

I put this over a page with colored images so you can see how transparent the image of the girl is. 

See how the print on the page is coming through the image?
Acrylic Gel Medium Transfers

This was the very first method I tried and I happened to learn it by accident.  

I got some acrylic gel medium on one of my images by accident and as clumsy as I am, I also got it stuck to a piece of cardstock. Realizing my mistake, I pulled the paper off the cardstock and noticed that parts of the image had been transferred to the blank card stock.  You can bet I never looked at my jar of acrylic medium in the same way after that. 

Simply apply some of the medium onto your image (I sometimes apply some of the medium onto my substrate as well) and slap the image face down on the page.  As with the gesso transfer, use a bone folder or an old credit card to rub the image firmly onto the paper.  Lift one side of the paper and peel the excess off leaving the image on your transfer surface.  To get more of the excess paper off, dampen the back of the image with water and rub gently with your finger.

This image was transferred onto a page I tore out of one of my altered book journals


You can also coat your image with the acrylic gel medium.  Just slap on at least 4 layers of the medium (make sure each layer is completely dry before you add another on top), turn the image over and gently peel the paper at the back of the image after getting it wet with water.  This results in what I call a "skin" -- an almost transparent image on a very, very thin sheet of medium.  It is quite fragile so I keep these sandwiched in between pages of an old book to keep them from tearing.

This is what it looks like while the acrylic medium is drying ( if you are not the most patient person in the world, a hair dryer set to the lowest setting can speed things up)


Here's the little girl on the image -- she's starting to show through!


And here is the finished "skin"


So now you're probably asking yourself -- what am I going to do with these? I'll give you a few suggestions in the next post.  And I promise it won't be months from now. :-) 

Monday, March 19, 2012

Little Ladies

A good friend once asked me why I tend to start things small - or expect to stay small.

Maybe because I don't think I'm good enough to make it big. Or maybe because I know I can and I'm afraid I can't handle what will come.  Or maybe because I'm afraid to make big mistakes -- because little ones are so much easier to correct and don't make me look as stupid as I feel.  Or maybe I don't really want anyone to see -- or maybe I do but I'm choosy about the people I want to share it with.  And I'm choosy about it because maybe I'm afraid of them judging me and calling me crazy to even think I can do anything amazing.

And maybe this line of thinking is going to get me nowhere.

And since old habits die hard, I started a series of small drawings using a set of aquarelle pencils I got for my birthday.  Really small -- about 2 inches wide by 2 inches tall.  I call them The Little Ladies.

Attempt No. 1


Here's No. 2
And No. 3
I liked that I could first lightly draw the image outline with a dry aquarelle pencil then run a damp paint brush over the lines to shade or lighten them as I pleased.  You do know how scared I am of watercolor right? So this medium gave me some control and was less scary for me. 

I like. :-)  Will definitely need more practice though.  And maybe I'll try to draw something bigger than 2 inches with these next time.